GTM server-side Client fetching current weather conditions from an OpenWeather API
Years ago I read the first articles about sending weather tracking as extra data in Google Analytics tracking hits.
If I’m not mistaken, one of the first ones was this one written by Simo Ahava: https://www.simoahava.com/web-development/universal-analytics-weather-custom-dimension/.
Weather data is as a great addition to web analytics implementations on a lot of different types of websites.
As an example, companies in areas like travel and hospitality could benefit from using it.
Answers would exist for questions like the following.
- Are more people buying trips to warm countries when it’s raining?
- Do more people cancel booked stays at our hotel when it’s nice weather where they live?
- In which weather conditions do we sell the most?
But then we have some issues that are introduced when fetching weather data live in a client-side tag management environment.
One big one would be potentially exposing your API/license key to everyone who knows about front-end development if you want to get the data from a license based service.
So I though a bit about using a GTM server-side Client to do just that.
This post describes how I have chosen to set it up.
The chosen approach
Since I wanted to both cater for client- and server-side tags needing the weather data, I quite quickly chose to create a custom server-side Client.
This Client should then return weather data as a response to client-side requests, but also a server-side event with all relevant weather data as parameters.
The following illustration shows my plan for communication between GTM client-side and server-side.
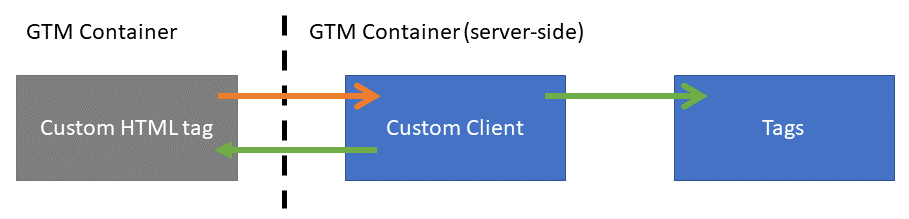
The orange arrow indicates a client-side GTM request to the GTM server-side Client.
And the two green arrows indicate the weather data being sent as a response to both client- and server-side GTM.
Which weather service to use?
And then there is the matter of choosing which weather API/webservice we should use.
I decided to go with the “Current Weather Data API” provided by https://openweathermap.org/.
Reasons being, that they have a rather generous free license tier, at least for developer use, easy to use API’s, great functionality, and good documentation.
You can find the documentation for the API/webservice I am using here: https://openweathermap.org/current. Information about license pricing can be found here: https://openweathermap.org/price.
Disclaimer: No, I am in no way connected to OpenWeather. And no, I am not getting payed to write this post either 😉
The GTM server-side custom Client Template
The Client is setup to answer requests to the following URL:
https://[YOUR SERVER-SIDE GTM HOSTNAME]/weather
The key here is, that the Client won’t ever run, if you don’t send any requests to this specific URL.
The Client is triggered by those incoming requests and will only run if any occur.
A bit further down this post, you’ll see how I am calling the Clients URL using a GTM client-side Custom HTML Tag.
Client input fields
The Client has some input fields you’ll need to fill out to be able to use it.
You can use GTM variables to fill out any of the fields as needed.
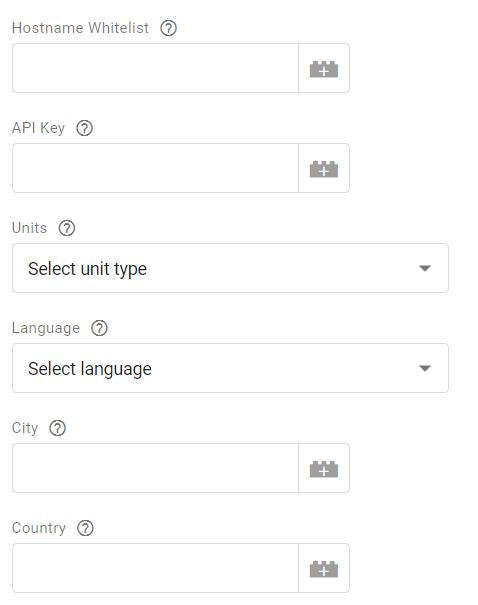
Hostname Whitelist
Here you add a comma-separated list of hostnames you want to allow communicating with the Client.
You can add a single hostname like “www.mysite.com” or a list of hostnames like “www.mysite.com,shop.mysite.com,community.myothersite.com”.
The important thing here is, that the hostname(s) you enter here, needs to be the ones equal to the origin of the requests received by the Client.
API Key
Here you add the API Key provided by OpenWeather.
You find or create one after logging in, in your personal account on the “API keys” page.
The API Key will look a bit like this: 37762436fb8247c3533d441ef268d0c4
Read more about this on the OpenWeather FAQ page: https://openweathermap.org/faq.
Units
Here you select which unit types you want the weather data to be returned in.
Options are: “Celcius / Metric”, “Fahrenheit / Imperial” and “Kelvin / Metric”.
Language
Here you select which language you want the weather data to be returned in.
There is a very long list of languages to choose from, so I won’t include all of them here.
It did take me a while to add them all as selectable options, and they’re all in there 🙂
City
Here you enter the name of the city you want to get the current weather condition returned for.
In most cases it wouldn’t make sense to hard code the value of this field, so I recommend you setting it to a GTM variable instead.
But if you want to, for instance to always fetch the weather data for a specific office location, then you’re able to do just that.
Since I am running my current server-side GTM container on Google App Engine, I personally prefer to use a variable containing the value of the Request Header named “X-Appengine-City”.
The Client also supports you sending the city name when sending a request from your client-side tag, directly as a query string parameter in the URL.
Read how to do that in below section about creating a “Custom HTML Tag” in client-side GTM.
Country
Here you enter the name of the country you want to get the current weather condition returned for.
In most cases it wouldn’t make sense to hard code the value of this field, so I recommend you setting it to a GTM variable instead.
But if you want to, for instance to always fetch the weather for a specific office location, then you’re able to do just that.
Since I am running my current server-side GTM container on Google App Engine, I personally prefer to use a variable containing the value of the Request Header named “X-Appengine-Country”.
The Client also supports you sending the country name when sending a request from your client-side tag, directly as a query string parameter in the URL.
Read how to do that in below section about creating a “Custom HTML Tag” in client-side GTM.
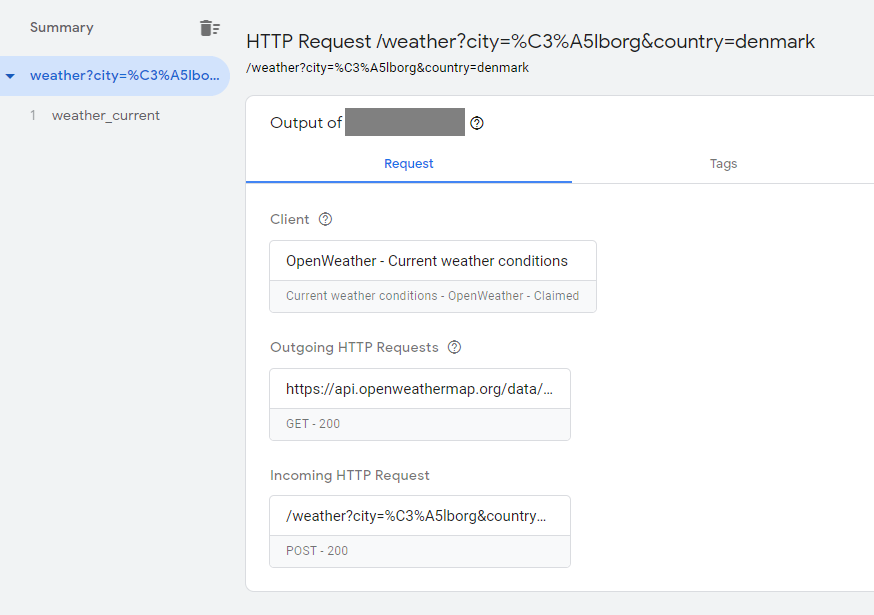
The Event Data output
A successful request to the Client will look something like the following in the GTM server-side debugger.
In this example I have choses to a definition of both City And Country as query string parameters directly in the request URL.
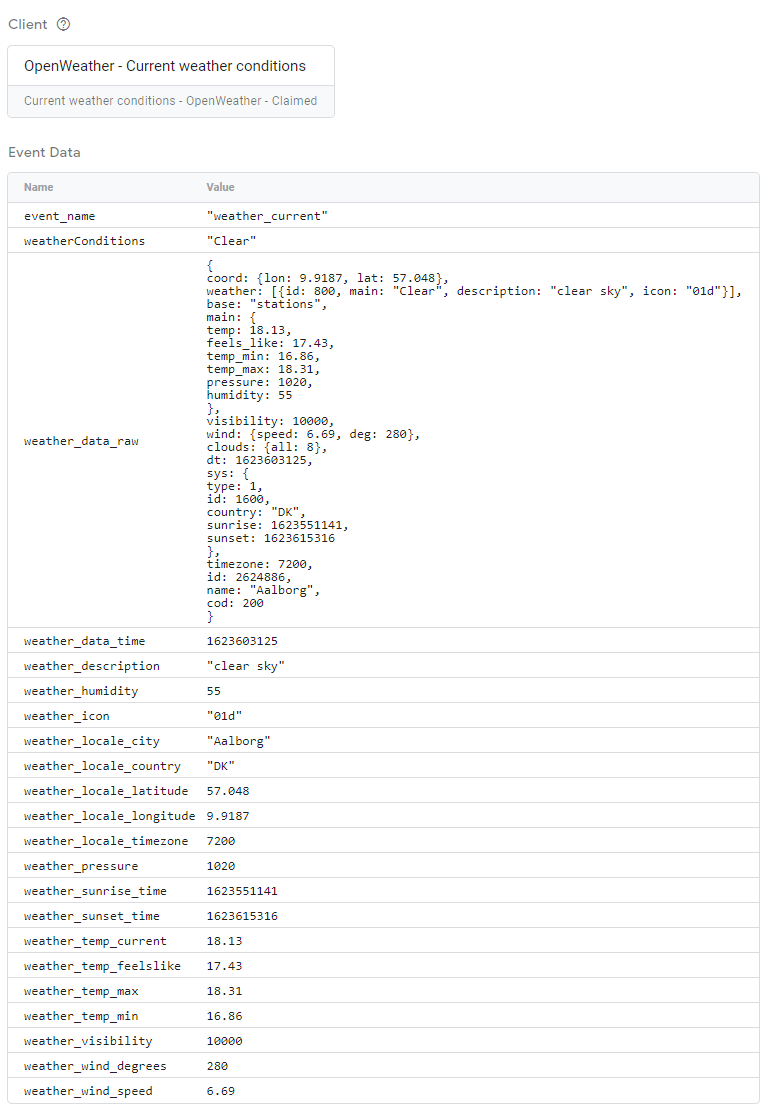
If we then take a look at the Event Data output from the successful Client hit, then you’ll see the following data.
This will almost precisely be the same you’ll see in your client-side GTM, if you’re using the JavaScript I’m providing for that purpose.
Where to get the Client template
Google hasn’t opened up for custom Client Templates in the Community Template Gallery yet.
But you can get the template for this Client through the following links.
GitHub repository
https://github.com/gtm-templates-pmeyerdk/current-weather-openweather-client
Direct link to the template file
https://github.com/gtm-templates-pmeyerdk/current-weather-openweather-client/blob/main/template.tpl
Hopefully you will be able to get it directly from the Community Template Gallery soon.
I have at lease done my part in submitting it for review by Google 🙂
The template code
If so inclined, you can have a look at the raw Client code here.
To see the entire template you’ll need to go through above mentioned links.
const claimRequest = require("claimRequest");
const encodeUriComponent = require("encodeUriComponent");
const getRequestHeader = require("getRequestHeader");
const getRequestPath = require("getRequestPath");
const getRequestQueryParameter = require("getRequestQueryParameter");
const JSON = require("JSON");
const returnResponse = require("returnResponse");
const runContainer = require("runContainer");
const sendHttpGet = require("sendHttpGet");
const setResponseBody = require("setResponseBody");
const setResponseHeader = require("setResponseHeader");
const setResponseStatus = require("setResponseStatus");

var originAllowed;
const hostnameList = data.hostnameWhitelist.toLowerCase().split(",");
hostnameList.forEach(hostname => {
  if (getRequestHeader("origin") === "https://" + hostname)
    originAllowed = true;
});

if (getRequestPath() === "/weather" && originAllowed === true) {
  claimRequest();

  const city = getRequestQueryParameter("city") ? getRequestQueryParameter("city") : data.city;
  const country = getRequestQueryParameter("country") ? getRequestQueryParameter("country") : data.country;

  const requestUrl = "https://api.openweathermap.org/data/2.5/weather?" +
        "q=" + encodeUriComponent(city) + "," + encodeUriComponent(country) +
        "&units=" + data.units +
        "&lang=" + data.language +
        "&appid=" + encodeUriComponent(data.apiKey);

  setResponseHeader("content-type", "application/json");
  setResponseHeader("access-control-allow-credentials", "true");
  setResponseHeader("access-control-allow-origin", getRequestHeader("origin"));

  sendHttpGet(requestUrl, (statusCode, headers, body) => {
    var responseBody, eventData;
    if (statusCode >= 200 && statusCode < 300) {
      responseBody = body;
      const weatherData = JSON.parse(body);
      eventData = {
        event_name: "weather_current",
        weather_conditions: weatherData.weather[0].main,
        weather_data_time: weatherData.dt,
        weather_data_raw: weatherData,
        weather_description: weatherData.weather[0].description,
        weather_humidity: weatherData.main.humidity,
        weather_icon: weatherData.weather[0].icon,
        weather_locale_city: weatherData.name,
        weather_locale_country: weatherData.sys.country,
        weather_locale_latitude: weatherData.coord.lat,
        weather_locale_longitude: weatherData.coord.lon,
        weather_locale_timezone: weatherData.timezone,
        weather_pressure: weatherData.main.pressure,
        weather_sunrise_time: weatherData.sys.sunrise,
        weather_sunset_time: weatherData.sys.sunset,
        weather_temp_current: weatherData.main.temp,
        weather_temp_feelslike: weatherData.main.feels_like,
        weather_temp_min: weatherData.main.temp_min,
        weather_temp_max: weatherData.main.temp_max,
        weather_visibility: weatherData.visibility,
        weather_wind_speed: weatherData.wind.speed,
        weather_wind_degrees: weatherData.wind.deg
      };
      setResponseStatus(200);
    }
    else {
      responseBody = "{}";
      eventData = {
        event_name: "weather_current",
        weather_data_raw: body
      };
      setResponseStatus(500);
    }
    setResponseBody(responseBody);
    runContainer(eventData, () => returnResponse());
  });

}
The GTM client-side Custom HTML Tag
To communicate with the GTM server-side Client, you will need to create a Custom HTML Tag yourself.
The tag should then contain a JavaScript supposed to communication with the server-side Client, just like communication with any other online accessible websites.
Below is my example of such JavaScript code, which results in a data layer push named “weather_current” including all the weather data as individually named parameters. To keep the amount of requests to the server-side Client somewhat down, this example code doesn’t send a request for weather data on each concurrent page view or event on your site.
<script>
  (function() {
    if (document.location.hostname != document.referrer.split('/')[2]) {
      var xhttp = new XMLHttpRequest();
      xhttp.withCredentials = true;
      xhttp.open("POST", "https://[YOUR SERVER-SIDE GTM HOSTNAME]/weather", true);
      xhttp.onreadystatechange = function() {
        if (this.readyState == 4 && this.status == 200 && this.responseText) {
          var weatherData = JSON.parse(this.responseText);
          if (weatherData && weatherData != {}) {
            window.dataLayer = window.dataLayer || [];
            window.dataLayer.push({
              "event": "weather_current",
              "weather_conditions": weatherData.weather[0].main,
              "weather_data_time": weatherData.dt,
              "weather_data_raw": weatherData,
              "weather_description": weatherData.weather[0].description,
              "weather_humidity": weatherData.main.humidity,
              "weather_icon": weatherData.weather[0].icon,
              "weather_locale_city": weatherData.name,
              "weather_locale_country": weatherData.sys.country,
              "weather_locale_latitude": weatherData.coord.lat,
              "weather_locale_longitude": weatherData.coord.lon,
              "weather_locale_timezone": weatherData.timezone,
              "weather_pressure": weatherData.main.pressure,
              "weather_sunrise_time": weatherData.sys.sunrise,
              "weather_sunset_time": weatherData.sys.sunset,
              "weather_temp_current": weatherData.main.temp,
              "weather_temp_feelslike": weatherData.main.feels_like,
              "weather_temp_min": weatherData.main.temp_min,
              "weather_temp_max": weatherData.main.temp_max,
              "weather_visibility": weatherData.visibility,
              "weather_wind_speed": weatherData.wind.speed,
              "weather_wind_degrees": weatherData.wind.deg
            });
          }
        }
      };
      xhttp.send();
    }
  })();
</script>
Including City and/or Country in the Request
If you want to, you can include both City and Country values in the Request URL.
It is of course also possible to include only one of the values in the URL.
You might want to do this, if the values you want to use are best available client-side, for instance in a form your users fill out.
To do this, find the following line of code in the Custom HTML Tag
xhttp.open("POST", "https://[YOUR SERVER-SIDE GTM HOSTNAME]/weather", true);
Then add query string parameters to the URL, so that is looks something like this
xhttp.open("POST", "https://[YOUR SERVER-SIDE GTM HOSTNAME]/weather?city=ålborg&country=denmark", true);
Notice the added City and Country definitions “ålborg” and “denmark”.
Also notice that the City parameter “ålborg” includes special characters, in this case Danish ones.
The API allows this to some degree, and will try to resolve the values automatically.
A value included in the URL will always take priority over the value entered in the Client input field.
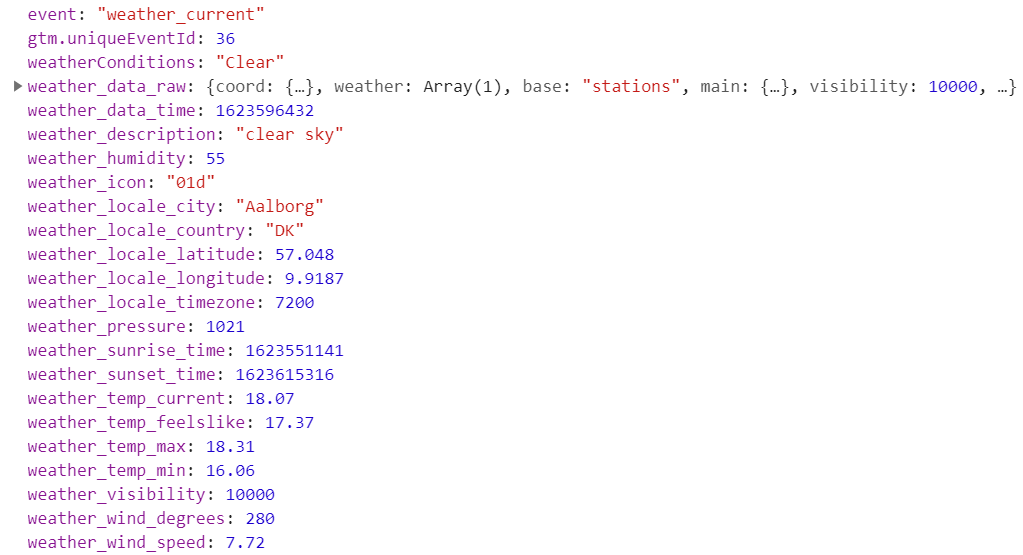
The GTM client-side data layer output
Running the above Custom HTML Tag will result in the following data layer push.
Most of the returned weather data points are here, though a few are not, since I didn’t see much reason for including them.
The value in the parameter names “weather_data_raw” includes the entire OpenWeather API response.
That way you will always be able to have a look at the entire data set if needed.
Final words
I hope this can be as usable for you, as it is for me 🙂
And if you learned something new while reading this, then it’s an even bigger win for me!
Checkout the following links for further reading about some of the concepts and features mentioned in this post.
- An introduction to server-side tagging (by Google)
https://developers.google.com/tag-manager/serverside/intro - Server-side Tagging In Google Tag Manager (by Simo Ahava)
https://www.simoahava.com/analytics/server-side-tagging-google-tag-manager/ - Utilize App Engine Headers In Server-side Tagging (by Simo Ahava)
https://www.simoahava.com/gtm-tips/utilize-app-engine-headers-server-side-tagging/ - OpenWeather – Weather APIs
https://openweathermap.org/api
Thanks goes out to the following in random order: Mark Edmondson (for being a great sparring-partner sharer of knowledge), Simo Ahava (for all the blog posts, videos and knowledge sharing), Google (for tools and documentation), and OpenWeather (for providing the weather webservice)! 👍🤘🙏